Beginner Processing Tips and Tricks
As an astrophotographer its hard enough to figure out what gear to buy and how to acquire images and then you have to learn how to stack and process everything. Hopefully this tutorial will help you start to learn the basics of processing so you can start to see results from your nights of imaging.
The first step is to inspect your data. You can do this by opening every image and inspecting them or using a program like Maxim or Pixinsight that have Blink tools. What you want to look for are oblong or football stars, clouds passing through your image, dew, possible frost, out of focus stars or other anomalies that may alter your stacked image. The occasional airplane with enough subs will generally stack out of your image so tossing those is not worth losing the data. If you blink you can also look for any possible asteroids or supernova. As you start to learn the software you can start to set parameters so the software knows which to reject and which to add to the stack rather then you doing them one by one.

After selecting your subs it will be important to calibrate your subs with darks, Flats, biases and flat darks. These calibration files will clean up your images from any dead pixels, dust donuts or other possible anomalies showing up in your image due to equipment issues.
All darks should match the temperature, bin and exposure time as your light/flat frames. You can optimize a higher exposed dark for a lower exposed image but its always best to use ones that match
Biases take care of read out noise from your camera
Darks help subtract thermal noise created by your sensor
Flat frames can help clean up dust donuts, OAG shadows, bad senor columns, vignetting and more.
If you don’t calibrate your images you can have artifacts that will get worse during processing as you stretch your image. There are programs that can help cosmetically remove some of these artifacts but its better to take care of it in the beginning. Calibration files can be taken any time so you dont have to waste good imaging weather on them however flats must be done at the same camera angle/focus as your images so if your camera shifts your flats wont match your lights. There are ways to create artificial flats but that is not ideal.
If you dont have a flat panel to take flats you can use a tablet, laptop or even learn to do dusk flats. If you forget to take flats but your images look fairly clean after exposure you should be able to process a clean image provided you dont over stretch it.
Once you have all the subs you want to register the data. You will use programs like above or Deep Sky Stacker to register your images.. You may not need to register your data if you don’t dither however not dithering can cause artifacts in your images. Dithering moves your image slightly on each acquisition so any artifacts will stack out. Registering your images will align those shifted images either by using star matching or plate solving routines. You register all the files together whether you use a One shot color or Mono camera.
Once your images are registered you need to stack your images. Depending on the program you use it may calibrate, register and stack altogether or you need to do it individually. One shot color images you can stack all your subs together. Mono cameras you want to stack each filter independently. When Stacking/Integrating your images you have options to add pixel rejection. Typically you can use sigma clip at default settings to get a good result and you can always play around with medium or average combination to see which works best on your image. You’ll start to see processing is a lot of trial and error. That doesn’t mean you cant find a good baseline of tools and settings to work with but every imaging night will differ in atmospheric disturbance, seeing conditions, transparency, moisture in the air and so on that can change the quality of subs.
After stacking you want to auto stretch your image so you can see the result. If you dithered you will see an offset boarder from all the image alignments. You really want to crop that out prior to working on the image so that area isnt calculated during background extractions or possible noise reductions. You need to apply that crop to all your stacked images so you keep the geometry of every image the same. If you forget you can possibly try to align the images again and crop later on but you may just have to start all over so its important to keep all the image sizes similar.
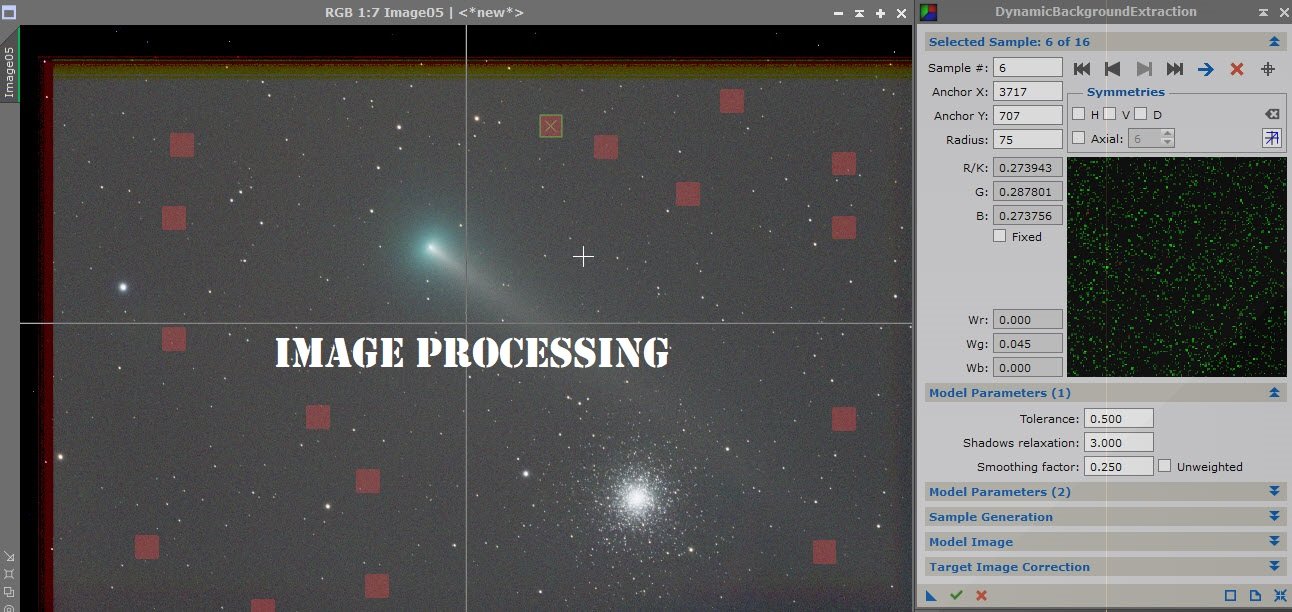
Now if you have a mono camera you want to combine your RGB or LRGB together. As you advance in processing you will work on Luminance and RGB separately. When you get your stacked image don’t get worried if it has an overall background color hue such as green, red, purple etc. This is caused by gradients from light pollution. In order to remove that you want to use dynamic background extraction or a gradient remover and subtract the gradient from your background. This is either done automatically or you need to select background points to generate a gradient map for removal. If you have a one shot color and a gradient remover doesn’t work you may need to check your X and Y color offsets. If you are left with a color after DBE a background neutralization should clean that up.

Once the gradient is removed you want to color calibrate your image. There are many ways to do this. Most programs have a color calibration routine. Pixinsight has two, color calibration and PCC. Maxim has a color calibration area during image combination. You can get your color calibration offset numbers by using programs such as Excalibrator. This will fix dull colors or colors that look off. PCC in pixinsight does this for you by matching your image coordinates to the star databases and color corrects.
Once you advance you will do other processes such as non linear noise reduction, drizzle, deconvolution and more. All these are good for cleaning up your image and pulling out some of the finer details.
Now from here you should have a linear image ready to stretch. You can do a histogram stretch, levels or digital development. Some programs may do an auto stretch. Stretching is one of those things where a little goes a long way. When stretching an image you are working with a bell curve. To change the bell curve and bring out your data your are adjusting shadow, mid tones and Highlights. You typically leave the far right highlights slider alone. This will really brighten the image when moved and can very easily blow out your stars. The mid tone slider will move your bell curve to the right and the shadow slider will bring it back to the left. Whether you move the Shadow and Highlights slider you never want to go into the bell curve. This is called clipping and will not only darken your background but you will lose data. Some people like the dark background when clipped however its not a natural look as space is not black. Your background should measure around .10. I will note sometime before your bell curve you can get little spikes of color channels and when you pass it your clipping percentage jumps. These small spikes are generally artifacts and its ok to clip those out of your image.


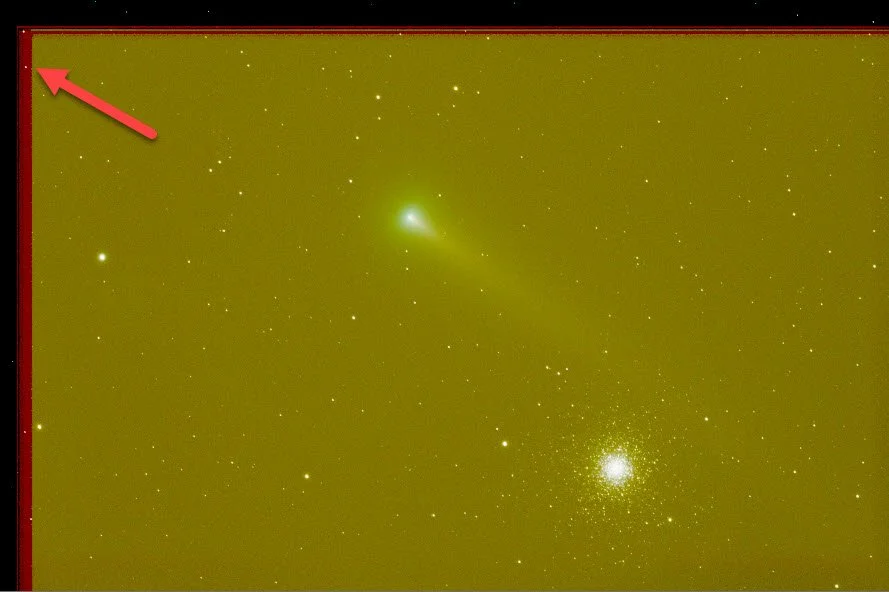
Now that you stretched your image its considered a non-linear image. You may notice the image has a green tint. This is caused by a strong green channel or possibly channels that arent aligned. Either way green is not a typical color in space unless you are imaging a comet or imaging in narrowband. I cant tell you how many images I have seen what could be a great image but green extraction was never done and it ruins the image. In Pixinsight you would use SCNR or if you use Photoshop you can download the free plugin Hasta-la-vista green.

From here you should have a fairly decent image and one that will certainly impress your friends.Some final processes you can consider is noise reduction to clean the background and image saturation. For noise reduction most programs either have an auto noise removal or you could use a Photoshop plug in like Noise ninja. You can tell you have noise if your background isnt flat and you have varying pixelated hues of green, blue and red shades.
Saturation will help boost and bring out the colors. Again like the histogram less is more. You can over saturate an image to where people will say its cooked. The colors are unnatural and will look like neon colors. Over saturating an image will not only destroy your image but it will also bring out other potential artifacts and ruin your background. As you advance in processing you will use masks to target specific areas and protect other areas you don’t want to affect.
Now you should have an image to be proud of and you’ve processed your data. The last thing you want is to go out night after night collecting data but never process it because you don’t know how or you are intimidated by the software. A lot of processing is trial and error but that in itself helps you learn what works and what doesn’t.
One last note: Imaging should be a fun and an enjoyable experience. What I’ve written is a great way to start and if you follow every step or skip some ultimately if you like your image then be proud of it. Typically no image is processed the same way and everyone adjusts their image to their own liking. If you find people commenting about something wrong either ignore it or take it as constructive criticism to learn how to correct it. Either way your sure to amaze your friends and family.
Processing software:
Pixinsight - for beginners to advanced users. Will require some research to learn the processes but its an all in one program for processing and continues to grow.
Astro Pixel Processor - APP is a great processing program. It gives you a numbered step by step numbered process from start to finish.
Other programs like Maxim and Astroart are a combination of acquisition software and processing software.
You can always use Photoshop and its wide range of Astro Macros, Filters and plugins if you already have it and don’t want to purchase another program.
Feel free to email me at Theastrogazer2@gmail.com if you have any questions about your process routines.