Sequence Generator Pro
Sequence Generator Pro Tutorial:
Things you will need prior to this tutorial:
Download a trial or purchase Sequence Generator Pro : Sequence Generator Pro
Download the Platesolver 2 Catalogs:
Calculate the pixel scale of your camera: CCD Calculator
PHD2 Open source guiding: PHD2
You will also need all the ASCOM drivers for your equipment installed.
Astrometry.net local files download: Astrometry Local (You only need these files if you will be observing without an internet connection)
This will be an in depth tutorial on setting up Sequence Generator Pro. We will go through the process of setting up your equipment profiles, plate solver, and how to setup your first run. There are many steps to get started but once you have everything setup this program is easy to use and fully automates your sequences.
When you start Sequence Generator Pro you will see the window below. You want to select Tools and User profile First.

In the User Profile window you are going to enter your observing location. You can store multiple locations if you have the coordinates. Once you enter or populate the coordinates go to the left part of the window and click below "Select or name a profile". Name the coordinates to the location and click save. If this location is your most common observing spot then you can click the box to use that location as your default. Note all profiles selected as default will be queued up on startup. Make sure if you are at another location to enter the new coordinates or go back and select the one you already entered.

Now we need to start entering information into the Equipment Profile Manager. This can be found under the tools menu. When this opens you will have multiple tabs and we will go through them one at a time.
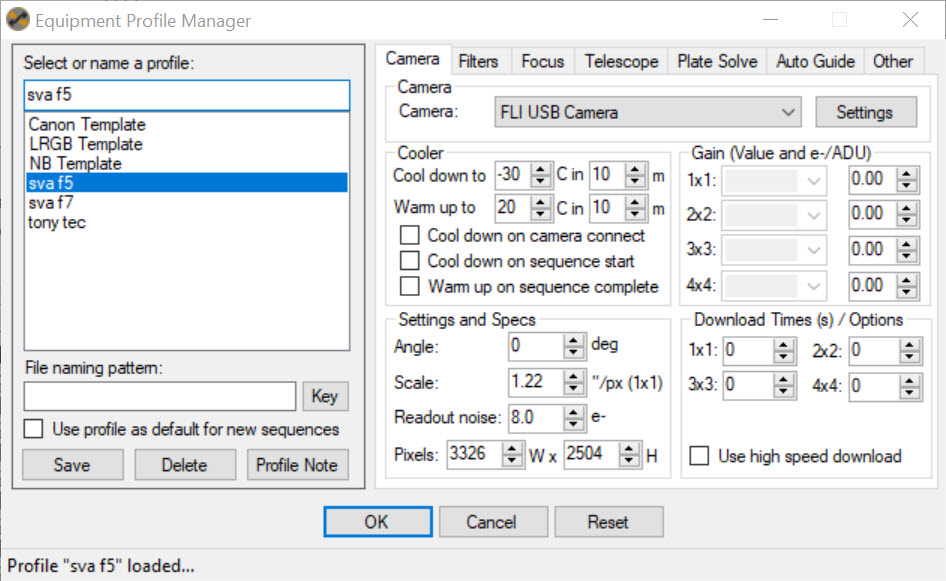
The first tab is the Camera tab. In there you want to select your camera from the drop down menu. There is a settings tab next to the camera name and that will bring up any settings available for your camera. You can only change the settings if your equipment is connected. If your camera has a controllable cooler then you can enter the degrees to cool down and in the amount of time you want it to cool down and the same for warming up the camera after your sequence finishes. You can also select when it cools and warms up. I recommend cooling once you connect the camera since it may take awhile and it can cool while you focus and plate solve.
Next is your camera settings and specs. The readout noise and the pixels you should have in either your camera user manual or you should be able to find it from your camera manufacturer or based on the chip model. The Angle setting is if you have an auto rotator and would like SGP to start at a specific angle. The scale would be your pixel scale. You can go the link above for the calculator or click here: CCD Calculator. Enter the information requested and it will calculate your scale to enter in the window. Download times and options would also be camera dependent. Once you have entered all those variable in you can again enter a name for the profile and save as well as select which profile you want as default. NOTE: You only really need to save your profile once you complete all the tabs however I generally save after each tab just in case something happens and you wont lose all the data you entered and time it took to enter it.
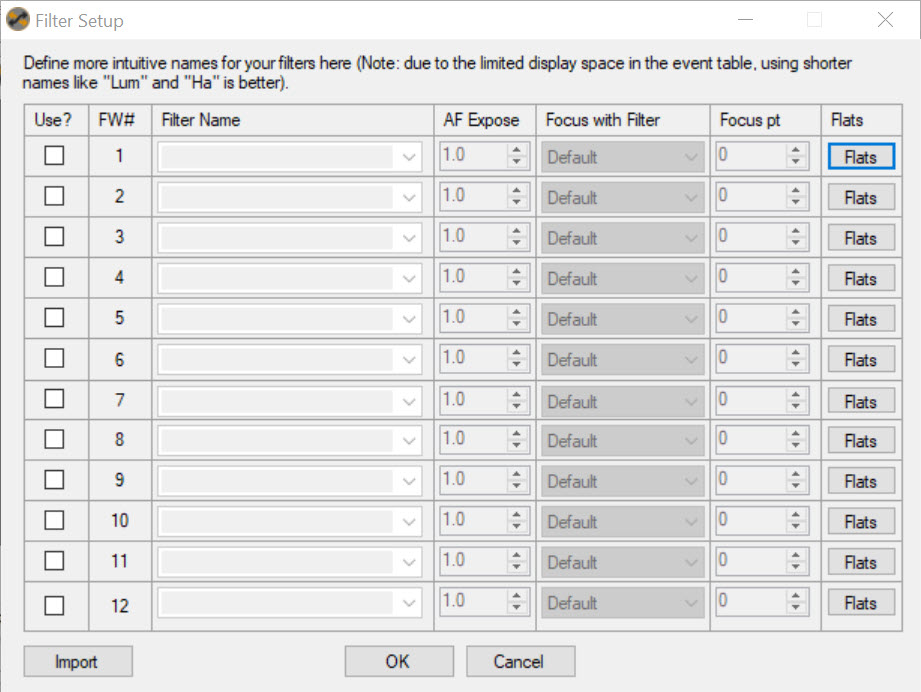
Next we move onto the filters tab. This tab is only for cameras with a filter wheel or FW. One shot colors or Mono cameras with no filter wheel will just leave "No filter wheel" selected and move on to the next tab. If you have a filter wheel select your FW from the drop down menu. Next click the Set Filters button. This will open up a window with numbered rows. Enter the filter type (LRGB, HA, OIII,SII, etc) in the order its in the filter wheel. Select the "Use?" check box for the filters you want to use for your sequence. If you arent going to use some, such as narrowband during an LRGB run then uncheck the narrowband filters. Once you do that you can set the A.F. Or auto focus exposure times for each filter. The next option is focus with filter. if you want SGP to focus for each filter then leave it as default however if you choose to setup the next row for focus points you will need to select your main filter. In order to use focus pt you basically take a filter such as LUM and find its step position when in focus. Write that number down and move to the next filter. Focus for RED from the LUM position and enter your position steps into the focus PT for red. Readjust to the LUM position and do the same for B and G. Once this is done select LUM as your focus filter for each filter. This will now take your step position for LUM and subtract the other filters position and adjust in or out depending on the number. For the most part this is accurate but with changes in temperature it may not be as accurate as a per filter focus. As for the flats, if you have a flats box with an ascom driver you can setup for flats to automatically be taken. Once your done here again enter your profile name and save.

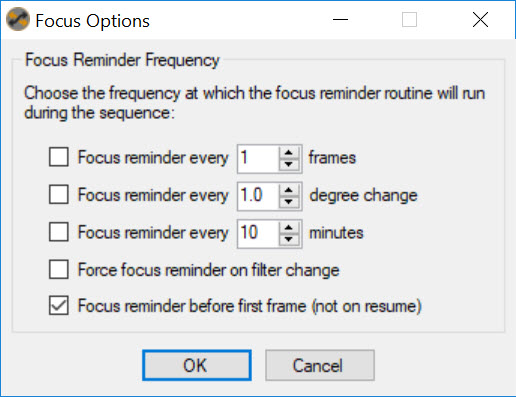
Next we move to the focuser tab. This is where you can set your focusers steps and setup auto focus. The first thing to do is select your focuser in the drop down menu. Once you have done that you should have default numbers in the Fine and coarse step size. If you dont I typically setup the fine at 10 and the coarse at 100. Next we start with the check boxes. The first check box is to reverse direction. If you use your focus motor and the in moves you out and the out moves you in then you can select this box to reverse the directions in the program. The next box is a focus reminder. Check off the box and select the set button to pick the reminder times. This is a great option if you don't use the auto focus routine.
The next tab is the auto focus tab. Sequence Generator Pro has a fantastic focus routine that I think is one of the better ones around and auto focus takes a lot of work out of your routine. Check the Auto focus box if you plan on using it and click the set button. Sequence Generator Pro uses the Half Flux Radius or HFR for focusing. You may be familiar with a different one called Full Width Half Max or FWHM that Maxim DL uses. If you have purchased Pinpoint you can use the FWHM in Sequence Generator Pro. In the Auto focus window you can select how often to run autofocus, before sequences start, after filter changes, etc. There are many options and pick the best one for you. You also can setup the focus times for individual filters, which filter to focus with and the step sizes for the focusing. The auto focus data points is how many points you want the routine to do when making the V curve. The more you do the longer it can take but the more accurate your focus will be.
Next you can auto focus per filter and if you have a thermometer for the focuser you can set temperature compensations for the steps per degree drop. Once you finish this make sure to save the profile.
When you do run the focus routine a focus window will pop up. When this window is open it will lock you out from doing anything else in Sequence Generator Pro. You will see the image capture of the stars, you will also see an overlay of the HFR for each star and then a V curve begin. If your HFR is to high the focus routine will give you a warning box that the HFR is higher than desired and you have the option to continue and accept it or to rerun the routine. If your not achieving optimal focus you can adjust the step sizes to allow for more steps or less in the routine.


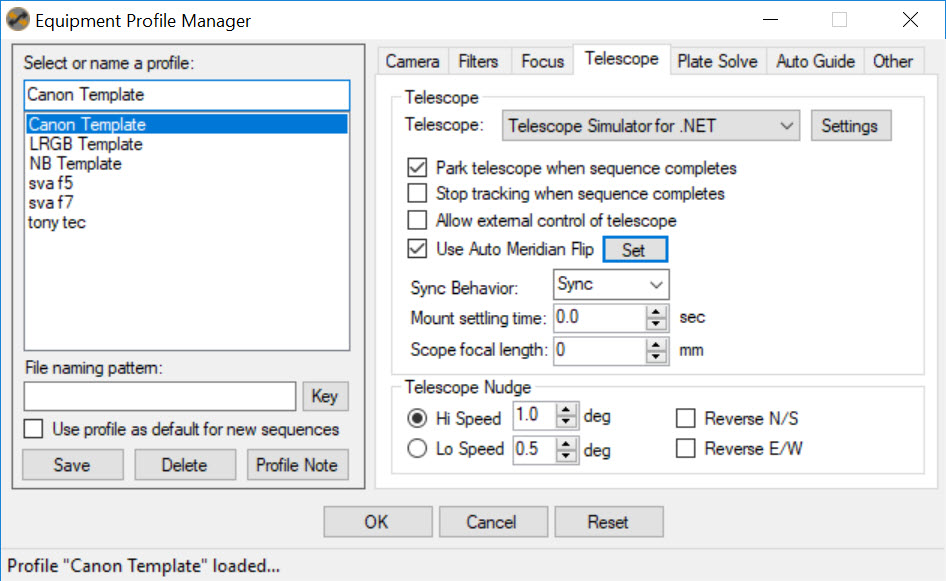
Next is the Telescope tab. Here you will enter your mount driver in the drop down menu. You can also select when to park the telescope, stop tracking, allow external control of the scope and Auto Meridian Flip. Under the Auto Meridian tab you can select how far past the meridian you want the flip to occur and whether or not Sequence Generator Pro Auto centers after the flip. Having used Sequence Generator Pro for awhile I find that the flip is typically 100% accurate however I have found the auto centering can be hit or miss and when it misses it can take some time to get back on point. Now this can obviously be caused by many issues but if you find the same problem I suggest turning off auto centering and just run an independent centering routine.

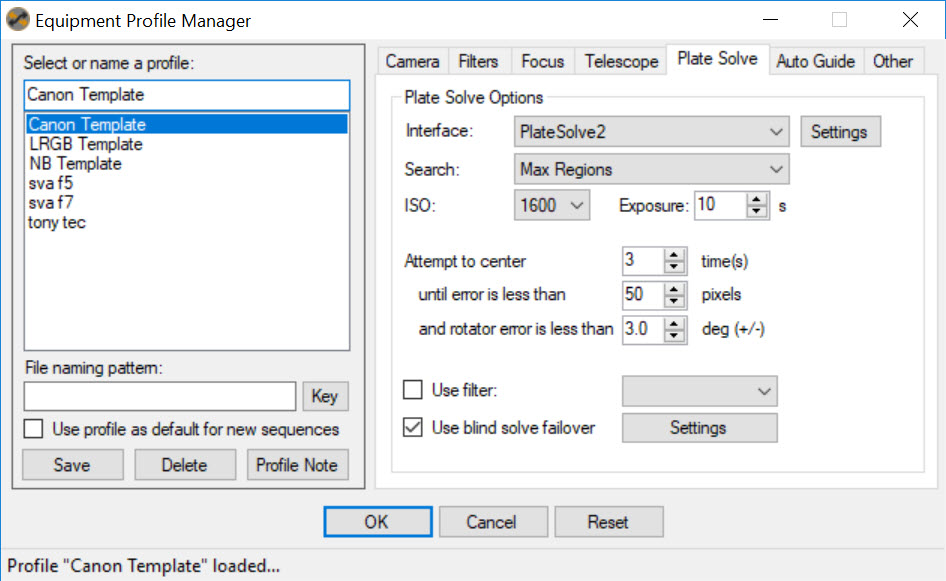
The next tab is the plate solve tab. This is where we will enter the Catalogs you downloaded from the top of the page. If you havent downloaded them please do that now. The UCAC3 catalog save where you will remember it and the APM Catalog you will install through an execution file so that will most likely be in your program files folder.
The first drop down menu you will select your plat solver preference. Again if you own pinpoint you can select that option. If you dont then you should use Plate Solver 2, which we will get into shortly. You can also use Astronomy.Net (Requires internet connection unless you download the files and use them locally) or Elbrus.
Now select Plate Solve2 from the menu but before selecting settings you can adjust the settings below. I find the default works fine. You also need to check and select which filter you want to focus with unless you have a one shot color and leave that unchecked. Finally select Use Blind Solve Failover. Blind Solve Failover basically will attempt to use Astronomy.Net to plate solve your image if Plat Solve2 fails. Astronomy.Net will usually find your location however again you either need an internet connection or download the local files.
After all that is setup select settings next to Plate Solve2. A new window will popup and under the FIle menu select Configure Catalog Directories. When the new window opens browse to the location of each of the catalogs. You should have a green OK when you have selected the correct directory locations. Once thats done you can close the window and save the profile.

One of the last tabs is the Auto Guiding tab. Here you want to select the guiding software you will be using. I recommend PHD2 but you can use any from the drop down. Once you select your Guiding software you will choose whether you want to dither or not. Dither moves your camera a certain amount of pixels before an image is taken. This will help to stack out artifacts from the camera during processing. You can select how often to dither, how agressive to dither and when to start guiding after dither has settled.
After that you can select when the guider stops, settles, etc. Once again save the profile.
Note: If you lose your guide star or your guiding goes higher than a certain pixel value Sequence Generator Pro will suspend your sequence. If the corrections of the guider takes a while to settle down then Sequence Generator Pro will suspend your sequence and you will have to go back and restart your sequence.

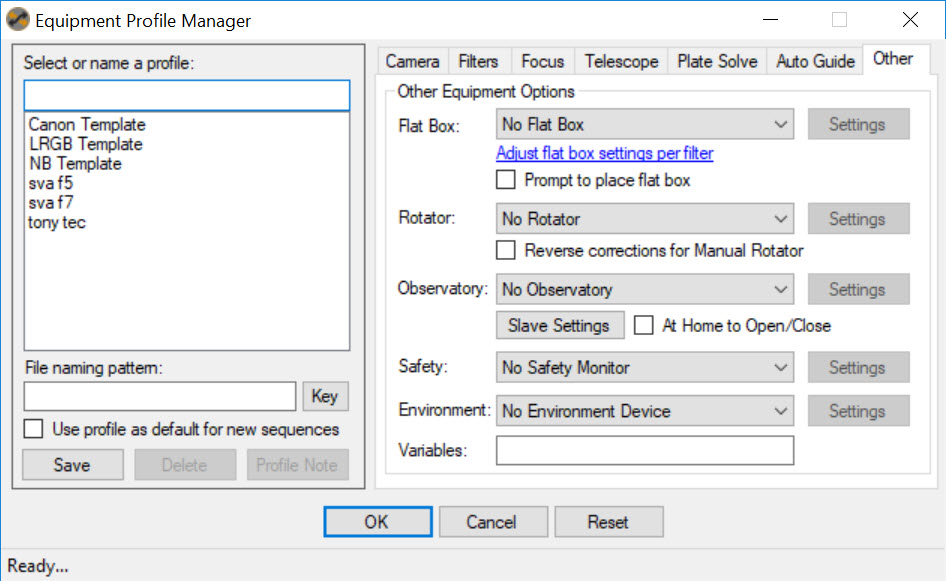
The last tab is Other. This is where you can setup a flatbox, rotator, Observatory, safety monitor etc.
Now that we are done with the equipment profiles. Double click on your saved profile and it should automatically load in the sequence window. If your equipment isnt preloaded then select your equipment from the drop down menu and click on the connect buttons beside each piece of equipment. You can also go under tools and connect all equipment or use the shortcut Control-Shift-C. You can also select the arrow under the telescope drop down menu to see other equipment you can connect. Once your connected slew to your target, get yourself plate solved on target, focus and start your auto guider. Once thats setup you can start to enter the information for you run. Select your directory for where you want the images to be saves. The %file Name will add FITS data to your files and the key icon will give you all the options. The glasses next to the key will show you how the information looks on the file. Then you can select whether or not you want a delay before the run start or between exposures. Delays between exposures is usually to allow for your guider to settle. Use this if you didnt setup the guider resume option upon pixel settling for a certain amount of seconds. The rotate through events or finish entire events list is for your sequence list. I recommend rotate through events for Mono cameras. If you select finish entire events then you risk getting only one color channel in a night if something happens.
Then you start entering your run data. Check run box for either different filters used or different exposures being done. The next drop down menu will have Light, for mono or OSC exposures, Dark, Flat, Bias. Select your filters for each color required or select none for OSC's. Suffix will be what you name the filter or the image file. Exposure will be the length of the exposure in secons. Bin is how much you want to bin the image and repeat is how many times you want to image that selections. Once your done click Run Sequence and Sequence Generator Pro will start capturing your images.

The last tip I want to talk about is the docking modules . These modules can be docked on the left and right of the screen. They can provide you with important information about your image sequence such as image quality, time left in a sequence, guiding graph, etc. To use the modules you go to Menu View -> Docking Modules and select the ones you want to use. They will popup on the screen and you drag them to the left or right side panel. When you dock them you will have the option to position them above or below existing modules.

Sequence Generator Pro has several other great features such as the framing and mosaic tool and focus lock. We will touch upon these in another tutorial.
Now that you have Sequence Generator Pro setup you can connect all your equipment to check for any connection issues and begin imaging. Clear Skies!