PHD2 Tutorial
PHD2 Tutorial: How to get stated guiding. This will show you how to setup PHD2 and trouble shoot common guiding issues.

PHD2 is an open source guiding program for beginners or advanced users. This program can be used in conjunction with many atrophotography programs, such as Sequence Generator Pro. This tutorial will help you get PHD2 setup and running with the default settings. Tweaking PHD2 is easily done and the settings vary from each equipment setup
To start you can download PHD2 Free from: PHD2
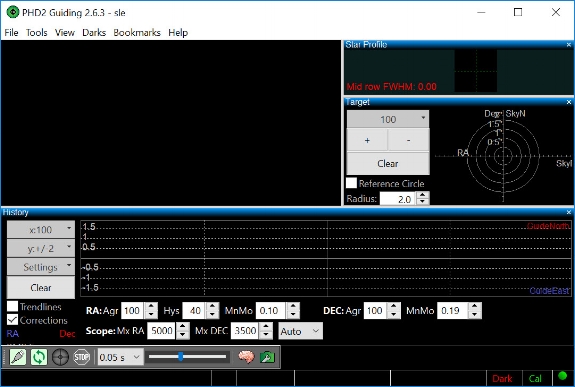
When you install PHD2 you should have a window similar to this:
The first step is to click on the green connection button in order to select your camera and mount drivers.
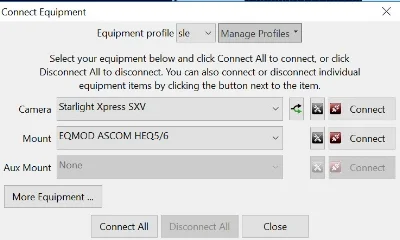
After you select the ascom drivers click connect all.
The Next step will be to click on the brain icon. Here you will enter your camera and scope information:

In the camera setting you will need to enter your guide camera's pixel size. This is camera specific.

The next tab is the Guiding tab. There you will need to enter your guide camera focal length as well as calculate your steps. To calculate your steps click the calculate button and a window will open. In that window enter your pixel size, guide scope focal length and the number of calibration steps you desire and click OK


Once you complete that you can exit the advance setup window and select the looping icon next to the connection button

After selecting Loop you can adjust the exposure time to get a star field in your field of view. If you are out of focus now is the time to use the looping feature to get into focus. The loop feature shows you the stars in the FOV and you need to select the best star. If you cant determine the best star PHD2 has a handy feature under tools called Auto-Select Star (Shortcut ALT-S). This will pick the most suitable star in the field.
Once you have the star selected you will click on the Cross Hair Icon to begin the calibration Sequence. The program will move your mount West and East then North and South. Provided the star was able to move the minimum required steps then you should begin guiding as soon as the calibration Completes.

Once guiding starts you will see the RA and Dec corrections. There are several things you can do if your corrections are large. The first step would be to Review calibration data under tools. This will how your calibration steps in white overlaying a blue (RA) and red (DEC) line. If your white calibration dots are far off then check your balance and possibly the mount head screws.

If your calibration data looks good then you can move to Guiding Assistant under tools. Check off the "Measure Declination Backlash". For this you want to press the start button and let the time run for at least a minute and you want the High frequency star motion numbers to level out with minimal correction. Once this happens click stop and the guiding assistant will move your mount to check your backlash. Note: the movements will move your star out of the Field of view and then bring it back. Once the Backlash measurement if complete PHD will adjust your Dec backlash as well as make recommendations for adjusting your MinMo Numbers.

If you still see large fluctuations you try adjusting the Aggressiveness of the RA and DEC and playing with the HYS and Minmo Numbers. Do small adjustments and wait a minute or two before trying to correct more. A little goes a long way and adjust whichever movement is not correcting against the center line. It is possible for a correction in either RA or Dec to slightly alter the other movement and you may need to make minor tweeks to bring it back to center.

If All else fails and you just cant get your RA and DEC to hug the "0" line then you should try a Drift Alignment under the Tool menu to check your Polar Alignment and apply the corrections.
You can view the Drift Alignment Tutorial Through PHD's Website: Drift Alignment Tutorial